Integrate Google Ads
When you integrate your Google Ads into SerpBear, you will unlock these features:
- Ability to Research keywords from the "Research" page.
- Generate keyword ideas for your websites based on their content, already ranking keywords in Google Search Console, and already tracking keywords or custom keywords.
- Ability to view monthly search volume data for tracked keywords.
Prerequisites
Before you begin, make sure:
- Your SerpBear instance is accessible via a publicly reachable URL (not
localhostor a.localdomain) if you plan to set up the OAuth integration from a remote machine. Google's OAuth redirect requires a valid, routable URL. - You have the
NEXT_PUBLIC_APP_URLenvironment variable set correctly in your.env.local(or Docker environment). This should be the full external URL of your SerpBear instance (e.g.,https://serpbear.yourdomain.com). This is used to construct the OAuth redirect URI reliably, especially behind reverse proxies.
Integrating Google Ads to SerpBear
Step 1: Create a Google Cloud Project
If you don't already have one, go to the Google Cloud website and log in with your Google account. Then once you land on the Google Cloud page, click the dropdown menu from the top left and create a new Project.
Step 2: Enable Google Ads API in your Google Cloud Project
From the top left corner click the menu icon and then click the "APIs & Services" and then click "Library".
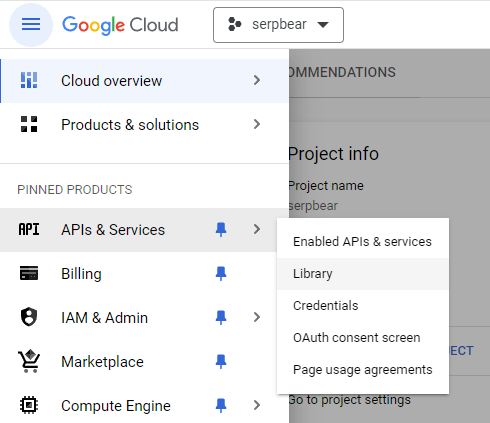
From the Library page, search for "google ads" and enable the Google Ads API.
Step 3: Obtain your Cloud Project's Client ID and Secret
Open the menu by clicking the menu icon from the top left corner of the screen and click "APIs & Services" and then click "Credentials".
Then obtain your Client ID and Client Secret keys by following along with this video instruction.
Note: In "Authorized redirect URIs" you need to insert your SerpBear instance's URL with /api/adwords appended at the end. The redirect URI must exactly match the URL your browser uses to access SerpBear. For example:
- If your SerpBear URL is
http://localhost:3000, the redirect URI should be:http://localhost:3000/api/adwords - If your SerpBear URL is
https://serpbear.yourdomain.com, the redirect URI should be:https://serpbear.yourdomain.com/api/adwords
Important: Make sure
NEXT_PUBLIC_APP_URLin your environment matches this redirect URI (minus the/api/adwordspart). This ensures the OAuth callback URL SerpBear generates matches what you registered with Google.
Once you have generated the client ID and the Client Secret, go to your SerpBear instance, open the Settings Panel, and then navigate to Integrations > Google Ads, insert the client IDs and Client Secret, and click the "Authenticate Integration" button.
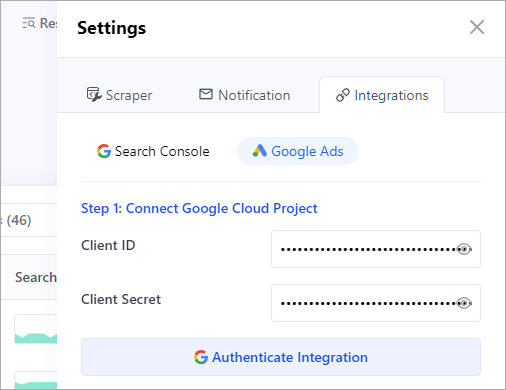
Once you click that button, a Google authentication page will appear in a new window and you have to give it the access it wants.
Step 4: Create a Google Ads Manager Account & Get the Developer Token
Go to the Google Ads Manager Account page and create a Manager Account (also called an MCC account).
Important: Use an email address that is not already associated with an existing Google Ads account. If your email already has a Google Ads account, you will need to use a different email for the Manager Account.
Once the account is created, click the "Tools" button from the top and then click the "API Center" menu.
When the API Center page opens up, copy the Developer Token, go back to SerpBear's Google Ads Integration Settings panel, and insert it in the Developer token field.
Step 5: Apply for Basic Access
When you first create a Manager Account, your developer token starts with Test Account Access or Explorer Access. These access levels cannot use the Keyword Planning features that SerpBear requires (KeywordPlanIdeaService).
You must apply for Basic Access (or higher) to use keyword research and search volume features:
- In your Google Ads Manager Account, go to Tools > API Center.
- Check your current access level. If it says "Test Account Access" or "Explorer Access", you need to apply for an upgrade.
- Click on Apply for Basic Access and fill out the required form.
- Basic Access review typically takes about 2 business days.
Note: Without Basic Access, you will get errors like
"Failed to connect to Google Ads"or"DEVELOPER_TOKEN_NOT_APPROVED"when trying to use keyword research features, even if everything else is configured correctly.
Step 6: Set Up the Account ID
You need a Google Ads customer account (also called a client account) to make API requests against. There are two options:
Option A: Use a Test Account (recommended for getting started)
- From your Manager Account dashboard, create a new Test Account by clicking the + button and selecting "New Test Account".
- Once created, copy the Account ID (the 10-digit number, e.g.,
123-456-7890). - Go to SerpBear's Google Ads Integration Settings panel and insert this Account ID in the Account ID field.
Note: Test accounts appear as "Cancelled" in the Google Ads UI with a red "Test account" label. This is normal.
Option B: Use an existing Google Ads Account
If you already have a Google Ads account (even one that isn't actively running campaigns), you can use its Account ID instead. The account just needs to be linked under your Manager Account hierarchy.
- From your Manager Account, link your existing Google Ads account (or note its Account ID).
- Insert the Account ID in SerpBear's Account ID field.
Step 7: Test the Integration
Once you have completed all the above steps, click the "Test Google Ads Integration" button. If you have set everything up properly, you should see a success message.
Step 8: Update the Keyword Volume Data of existing keywords in the tracker
Click the "Update Keyword Volume Data" button to update the search volume data for the existing keywords in the tracker. You will only need to do it once as from now on, whenever you add new keywords, the volume data will be automatically fetched from Google Ads.
Troubleshooting
"Failed to connect to Google Ads. Please make sure you have provided the correct API info."
This is the most common error. Check the following:
-
Developer Token Access Level: Make sure you have Basic Access or higher. Test Account Access and Explorer Access cannot use the Keyword Planning API. Check your access level at Tools > API Center in your Google Ads Manager Account.
-
API Version: SerpBear must use a supported Google Ads API version. Google regularly sunsets old API versions (typically after ~12 months). If you're running an outdated version of SerpBear, update to the latest release. Check Google's sunset schedule if unsure.
-
Account ID: Make sure the Account ID you entered belongs to an account that is linked under your Manager Account. The API needs the account to be accessible through the Manager Account's hierarchy.
-
Developer Token: Verify the Developer Token is from your Manager Account (not a test manager account). Go to your Manager Account's Tools > API Center to confirm.
"redirect_uri_mismatch" Error During OAuth Authentication
This error means the redirect URI that SerpBear sends to Google doesn't match what you registered in Google Cloud Console. Common causes:
-
Reverse proxy not forwarding headers: If SerpBear is behind a reverse proxy (Nginx, Apache, Caddy, Traefik, etc.), make sure the proxy forwards the correct headers. SerpBear uses these headers to construct the OAuth redirect URL.
For Nginx, add these to your server block:
proxy_set_header Host $host;
proxy_set_header X-Real-IP $remote_addr;
proxy_set_header X-Forwarded-For $proxy_add_x_forwarded_for;
proxy_set_header X-Forwarded-Proto $scheme;
proxy_set_header X-Forwarded-Host $host;
For Apache, add these directives:
RequestHeader set X-Forwarded-Proto "https" env=HTTPS
RequestHeader set X-Real-IP %{REMOTE_ADDR}s
RequestHeader set X-Forwarded-For %{REMOTE_ADDR}s
RequestHeader set Host %{HTTP_HOST}s
ProxyPreserveHost On -
NEXT_PUBLIC_APP_URLnot set: Set this environment variable to your full external SerpBear URL (e.g.,https://serpbear.yourdomain.com). SerpBear will use this as the base for the OAuth redirect URI, which is the most reliable method behind reverse proxies. -
HTTP vs HTTPS mismatch: If you access SerpBear via HTTPS but the redirect URI is generated as HTTP, set
NEXT_PUBLIC_APP_URLwith thehttps://prefix, or ensure your reverse proxy sends theX-Forwarded-Protoheader. -
Synology NAS / Non-standard reverse proxies: Some NAS devices and custom reverse proxy setups may mangle headers. If the above steps don't resolve the issue, try accessing SerpBear directly (bypassing the proxy) to complete the OAuth step, or set
NEXT_PUBLIC_APP_URLexplicitly.
"Error Loading Keyword Volume Data" or Volume Update Fails Silently
- Check your developer token access level — this is the #1 cause. Explorer Access and Test Account Access cannot call keyword volume endpoints.
- Check the SerpBear server logs (Docker:
docker logs <container>) for detailed error messages. Look for lines starting with[ERROR] Google Ads. - If the logs mention a deprecated API version, update SerpBear to the latest release.
403 Error During Google OAuth
If you get a 403 error on the Google authentication page:
- Make sure the OAuth consent screen is configured in your Google Cloud project (APIs & Services > OAuth consent screen).
- If your app is in "Testing" mode, add your Google account email to the list of test users in the OAuth consent screen configuration.
- Verify the required scope
https://www.googleapis.com/auth/adwordsis listed in your OAuth consent screen scopes.
"No Code Provided By Google. Please Try Again!"
This occurs when you visit the /api/adwords endpoint directly without going through Google's OAuth flow. Make sure you're using the "Authenticate Integration" button in SerpBear's settings to trigger the OAuth flow.
Common Google Ads API Error Codes
| Error | Meaning |
|---|---|
DEVELOPER_TOKEN_NOT_APPROVED | Your token doesn't have the required access level (need Basic Access) |
USER_PERMISSION_DENIED | The Account ID is not accessible from your Manager Account |
CUSTOMER_NOT_FOUND | The Account ID doesn't exist or is malformed |
OAUTH_TOKEN_INVALID | Refresh token expired or was revoked — re-authenticate via Settings |
RESOURCE_EXHAUSTED | Rate limit exceeded — wait and try again |
Still Having Issues?
- Check the logs: Run
docker logs <container_name>(for Docker) or check the terminal output for lines containing[ERROR]. - Re-authenticate: Go to Settings > Integrations > Google Ads and click "Authenticate Integration" again to generate a fresh refresh token.
- Update SerpBear: Make sure you're running the latest version. Google regularly sunsets old API versions, and older SerpBear releases may use a version that no longer works.