Integrate Google Search Console
When you integrate your Google Search Console Account, you will unlock these features:
- Ability to View the Actual visit counts, impressions, and Average Position beside each tracked data.
- Ability to Explore already ranking keywords in Google.
- Ability to View the Stats for the Last 30 days. Easily View the top keywords, countries and pages.
- Get the Last 7 days' Search Console Data in the notification Email.
To integrate your Google Search Console Account with SerpBear, follow these steps:
Step 1: Create a Google Cloud Project
Create a New Project in Your Google Cloud.
Step 2: Activate the Google Search Console API
Once you have created the project, activate the Google Search Console API by going to your Google Cloud Dashboard > Library.
Then Search for "Google Search Console" and click the "Enable API" button.
Important: Make sure the API status shows as Enabled on the Search Console API page. If you skip this step, SerpBear will return a "Forbidden" error when fetching data, even if your credentials are correct.
Step 3: Create a Service Account Key
- Go to Google Service Accounts Dashboard, and then select your Project.
- If no service account exists yet, click "+ Create Service Account" at the top. Give it a name (e.g.,
serpbear), then click Create and Continue. For the Role, select "Viewer" under Basic roles (or skip the role assignment, since access is granted via Google Search Console in Step 4). Click Done. If a service account already exists, proceed to the next step. - Click the three dots beside the service account, and click the "Manage Keys" option.
- Once you are on the Manage Keys page, click the Add key button and select JSON.
- A JSON file will be downloaded. This file contains the
private_key&client_emailvalues needed for the next step.
Note for Google Cloud organizations created after May 2024: Google enforces the
iam.disableServiceAccountKeyCreationpolicy by default on new organizations, which blocks JSON key creation. If you see a "Key creation is not allowed on this service account" error, you need to disable this policy:
- Open the Google Cloud Shell.
- Run:
gcloud org-policies delete iam.disableServiceAccountKeyCreation --organization=YOUR_ORG_IDYou need the Organization Policy Administrator role to run this command. If you are using a personal Google account (not part of an organization), this policy does not apply.
Step 4: Connect your Google Cloud Account with your Google Search Console Properties.
- Go to your Google Search Console Dashboard, and select the domain you want to connect with SerpBear.
- Go to the Settings page, and click the "Users & Permissions" menu.
- From the Users and Permissions page, click the "Add User" button.
- In the Add User popup, paste the
client_emailvalue from the JSON file downloaded in Step 3. Set the permission level to "Full".
Note: You must perform Step 4 for every domain you want to connect to SerpBear.
Step 5: Connecting Your Google Search Console Property to SerpBear
Choosing the Correct Property Type
Before connecting, you need to know what type of property your domain is in Google Search Console. There are two types:
- Domain property (e.g.,
example.com): Covers all subdomains and protocols automatically. Shown in GSC without a protocol prefix. - URL-prefix property (e.g.,
https://example.com/): Covers only the specific URL prefix. Shown in GSC withhttps://orhttp://.
To check your property type, go to Google Search Console and look at the property selector dropdown. Domain properties appear as example.com, while URL-prefix properties appear as https://example.com/.
When connecting through the Domain Settings UI in SerpBear, you must select the matching Property Type:
- If your GSC property is a Domain property → select "Domain" in SerpBear.
- If your GSC property is a URL-prefix property → select "URL" in SerpBear and enter the exact URL as it appears in GSC (e.g.,
https://example.com/).
Common cause of "Forbidden" errors: Selecting "Domain" in SerpBear when your GSC property is actually a URL-prefix type (or vice versa) will result in a Forbidden error. The property type in SerpBear must match what is configured in Google Search Console.
There are a few ways to connect your Google Search Console credentials to SerpBear:
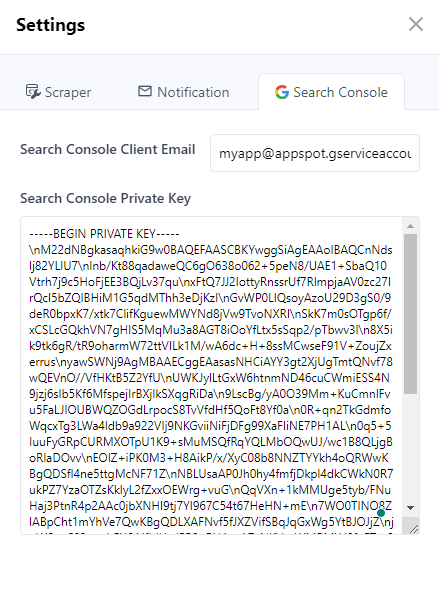
Method 1: Connecting through the App Settings UI.
Open the SerpBear App Settings Panel, click the "Search Console" tab, and insert the private_key & client_email into the relevant fields. These two values will be automatically used globally for all your domains added to SerpBear.
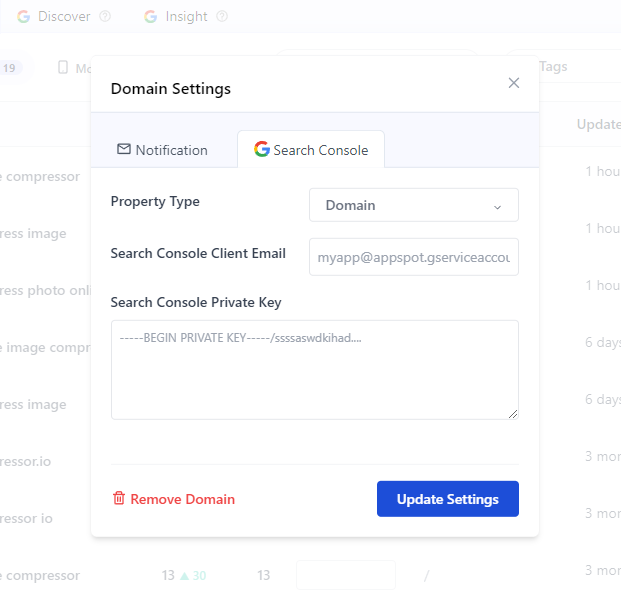
Method 2: Connecting through the Domain Settings UI.
You can connect a specific account to a specific domain by inserting the private_key & client_email values through the Domain Settings Modal. Make sure to select the correct Property Type as described above.
Method 3: Connecting through the environment variable
When you pass the private_key & client_email via environment variables, the values are used for all the domains, assuming the service account has access to all your domains in Google Search Console.
If you are deploying locally, open the .env.local file and add the 2 values like this:
SEARCH_CONSOLE_PRIVATE_KEY=-----BEGIN PRIVATE KEY-----\ssssaswdkihadho\nlnb/Kt88qQC6gO638o062+5peN8/UAE1+SbaQ10Vtrh7j9c5HoFjEE3BQjLv37qu\nxFtQ7JJ2IottyRnssrUf7RlmpjaAV0zc27IrQcI5bZQIBHiM1G5qdMThh3eDjKzI\nGvWP0LIQsoyAzoU29D3gS0/9deR0bpxK7/xtk7ClifKguewMWYNd8jVw9TvoNXRI\nSkK7m0sOTgp6f/xCSLcGQkhVN7gHIS5MqMu3a8AGT8iOoYfLtx5sSqp2/pTbwv3l\n8X5ik9tk6gR/tR9oharmW72ttVILk1M/wA6dc+H+8ssMCwseF91V+ZoujZxerrus\nyawSWNj9AgMBAAECggEANHCiAYY3gt2XjUgTmtQNvf78wQEVnO//VfHKtB5Z2YfU\nUWKJylLtGxW6htnmND46cuCWmiESS4N9jzj6sIb5Kf6MfspejIrBXjlkSXqgRiDa\n9LscBg/yA0O39Mm+KuCmnlFvu5FaLJIOUBWQZOGdLrpocS8TvVfdHf5QoFt8Yf0a\n0R+qn2TkGdmfoWqcxTg3LWa4ldb9a922VIj9NKGviiNiFjDFg99XaFliNE7PH1AL\n0q5+5IuuFyGRpCURMXOTpU1K9+sMuMSQfRqYQLMbOQwUJ/wc1B8QLjgBoRlaDOvv\nEOlZ+iPK0M3+H8AikP/x/XyC08b8NNZTYYkh4oQRWwKBgQDSfl4ne5ttgMcNF71Z\nNBLUsaAP0Jh0hy4fmfjDkpl4dkCWkN0R7ukPZ7YzaOTZsKkIyL2fZxxOEWrg+vuG\nQqVXn+1kMMUge5tyb/FNuHaj3PtnR4p2AAc0jbXNHI9tj7YI967C54t67HeHN+mE\n7WO0TINO8ZlABpCht1mYhVe7QwKBgQDLXAFNvf5fJXZVifSBqJqGxWg5YtBJOJjZ\njqWSvqC03x+ahFU91JfLJUwl5B8pRHAsaA7zNKVtuWMRMYd8fnETut8kfi+U/5D4\nLmAg+shajBHY/3EeEvVk6V0vGPX5oSl5ILjoeRwy08V+QngfNuGlrZEeY6MFhtl2\nuKfgicw2vwKBgECLf1OcE40AcAkTvnwb+6o8zVgMHrOcwAfwrtdJnMXTfPqucRuO\npuiSZMxe3c3i3fJTm9HFTGij7qIOVBJXXVwBLkoKqmfLf18X9GZgqgCVQoHo7gxA\n9fSnf5flqhVue+NED9K0LZED8aMFAhZAtNIUpC8Q5m07lh4Amvip6r0BAoGANI1K\nKPT4T043DlPgQ8F2bW2GSY4nlURy+4XJc+qfTR575EpeXOQbdfvlecVB6EAvXMpn\nUqJAPeKynzbVdG6YeijIkX2qfi6tH/WcEem87OlVk2YvrT3o/HLyCcHBjwj+1raG\nEk155Ail+MLkl+xu04nO/rNw5XS7rdp6R6RUibECgYAuuCMfonurnYqzQGhH35TT\ng+Ruk4WaOH/cYavwBbsCrrBBNjcaziGjayJ1+uZ1kKmgfU7DDCF3hZl7iZXqbdbe\n1GWBOcNgsqAG+wqWP4VVXQmEGh/kgG+w1Ck+fT4AnpN2O9+1t/MzxxWq/6vQRG4r\n9vwn1x8VDHvFrKuPYKYv6A==\n-----END PRIVATE KEY-----\n
SEARCH_CONSOLE_CLIENT_EMAIL=myemail@appspot.gserviceaccount.com
If you are deploying with Docker and passing environment variables directly with the docker run command, you must also pass these 2 variables.
If you use docker-compose, you can insert these 2 values in the environment section.